Creating a WordPress website has never been easier, and with the popularity of this content management system (CMS), building a website from scratch is now within the reach of even the most technologically challenged individuals.
WordPress is one of the most popular CMS platforms on the market today, which powers over 40% of all websites on the internet. Whether you’re starting a blog, an online store, or a portfolio website, WordPress offers a range of options to help you create the website you’ve always dreamed of.
In this comprehensive guide, we’ll walk you through the process of building a WordPress website from start to finish.
We’ll cover everything you need to know, including choosing a domain name and choosing web hosting, installing WordPress, choosing a theme and designing your website, customizing the website, creating pages and posts, installing plugins, and finally, launching your website to the world.
With the step-by-step instructions and helpful tips provided in this guide, you’ll be able to create a professional-looking WordPress website, even if you have no prior experience in web design or development. Whether you’re building a WordPress website for personal or business use, this guide will help you get up and running in no time. So, let’s dive in and get started!
Step 1: Choose a domain
Choosing a domain name for your WordPress website is the first yet one of the most important steps in building a successful online presence.
A domain name is your website’s address on the internet (e.g. www.example.com). Your domain name is essentially the address that people will use to access your website, and it’s what will help to establish your brand and make it easy for people to remember.
When choosing a domain name, it’s important to keep a few key things in mind. Here are some tips to help you choose the perfect domain name for your website:
Make it memorable:
Your domain name should be easy to remember and spell. Avoid using numbers or special characters, and try to keep it as short as possible.
Choose a relevant domain name:
If your website is focused on a particular niche or topic, consider including keywords in your domain name to make it clear what your website is about.
Avoid trademark infringement:
Make sure the domain name you choose doesn’t infringe on any existing trademarks. This can cause legal issues and damage your brand.
Consider your audience:
If you’re targeting a specific geographic location, consider including the location in your domain name (e.g. “example.com/city”).
Choose a top-level domain (TLD):
The TLD is the extension at the end of your domain name (e.g. “.com”, “.org”, “.net”). Choose a TLD that is relevant to your website and target audience. The “.com” TLD is the most popular and widely recognized, but other TLDs, such as “.org” or “.net”, may also be appropriate.
Once you’ve considered these factors and have a list of potential domain names, it’s important to check their availability. You can do this by using a domain name availability checker tool, which will let you know if the domain name you want is available for registration.
Once you’ve found a domain name that is available and meets your criteria, it’s time to register it. This can be done through a domain registrar, which is a company that manages the registration of domain names. Some popular domain registrars include GoDaddy, Namecheap, and Network Solutions.
Step 2: Choosing a WordPress Hosting
Choosing a hosting service is one of the most important decisions you’ll make when building a WordPress website. Your hosting will provide the foundation for your website, and it can have a significant impact on the speed, reliability, and security of your site.
There are many different hosting options available, but not all of them are suitable for a WordPress website. To help you choose the best hosting service for your website, here are some factors to consider:
Compatibility with WordPress:
It’s important to choose a hosting service that is specifically designed for WordPress websites. This will ensure that your website has the necessary resources and support to run smoothly.
Server performance:
Server performance is a key factor to consider when choosing a hosting service. Look for a hosting service that uses fast, reliable servers to ensure that your website loads quickly and runs smoothly.
Storage and bandwidth:
Make sure the hosting service you choose provides enough storage and bandwidth to meet your needs. The amount of storage and bandwidth you need will depend on the size and complexity of your website.
Customer support:
Good customer support is essential when it comes to hosting services. Look for a hosting service that provides 24/7 support and has a knowledgeable and responsive support team.
Pricing:
Hosting services come in a range of prices, from free to hundreds of dollars per month. Consider your budget and the number of resources you need when choosing a hosting service.
There are several different types of hosting services to choose from, including shared hosting, virtual private server (VPS) hosting, dedicated hosting, and managed WordPress hosting.
- VPS hosting provides more resources and control than shared hosting, but it’s also more expensive. VPS hosting is a good choice for larger websites or online stores that need more resources and performance.
- Dedicated hosting provides the ultimate in resources and control, but it’s also the most expensive option. Dedicated hosting is a good choice for large websites or businesses that require maximum control and performance.
- Managed WordPress hosting is a type of hosting that is specifically designed for WordPress websites. It provides a range of features and resources to help you manage and optimize your website, and it’s a good choice for both novice and experienced users.
Managed WordPress hosting typically includes features such as automatic backups, easy site migration, and expert technical support. These features can help to ensure that your website is up-to-date and running smoothly, even if you don’t have a lot of technical expertise.
When choosing a managed WordPress hosting service, be sure to consider factors such as the number of websites you can host, the amount of storage and bandwidth provided, and the level of customer support offered.
Step 3: Install WordPress
Once you have your hosting and domain name ready, now it’s time to install WordPress to build your website. While the process may seem intimidating at first, it’s actually quite straightforward and can be completed in just a few steps.
Why Use WordPress to Make a Website?
- User-Friendly: One of the main reasons why WordPress is so popular is because it’s user-friendly. The interface is intuitive and easy to use, even for those who have never built a website before.
- Customizable: WordPress is highly customizable, which means you can create a website that truly reflects your brand and style. There are thousands of themes and plugins available to choose from, allowing you to add unique functionality and customizations to your site.
- SEO Friendly: WordPress is optimized for search engines, making it easier for your website to rank higher in search engine results pages (SERPs). This can help increase your visibility and drive more traffic to your site.
- Large Community: WordPress has a large and active community of users, developers, and experts. This community provides support, resources, and updates, making it easier for you to keep your website up-to-date and functioning smoothly.
Importance of WordPress in Today’s Digital Landscape
- Popularity: WordPress powers over 40% of all websites on the internet, making it the most popular website builder and CMS in the world.
- Mobile-Friendly: With the rise of mobile devices, it’s important to have a website that is optimized for viewing on all devices. WordPress themes are mobile-friendly and responsive, ensuring that your website will look great on any device.
- E-Commerce Capabilities: WordPress has a range of e-commerce plugins available, making it easy for you to sell products or services online. Whether you’re a small business owner or an entrepreneur, you can use WordPress to build an online store and reach a wider audience.
Step-by-Step Guide to Installing WordPress
Installing WordPress can be done either manually or using an auto-installer provided by many web hosts.
Installation WordPress Manually
Installing WordPress manually requires downloading the WordPress software, uploading it to your web server, and setting up the database. The process can be more time-consuming and requires a bit more technical know-how, but it can also offer more control and customization options.
Here are the basic steps for a manual installation of WordPress:
- Download WordPress: Visit the WordPress.org website and download the latest version of the software.
- Create a database: You will need to create a database for your WordPress installation. Most web hosts offer a database manager that makes this process easy.
- Upload the WordPress files: Use an FTP client to upload the WordPress files to your web server.
- Configure the wp-config.php file: You will need to edit the wp-config.php file to include your database information.
- Run the installation script: Once the files are uploaded, visit your website to start the installation script.
Using WordPress Auto Installer
On the other hand, many web hosts offer an auto-installer for WordPress, which automates the installation process and eliminates the need for manual steps.
Here are the basic steps for installing WordPress using an auto-installer:
- Choose a good web host: Look for a web host that offers an auto-installer for WordPress.
- Click on the auto-installer: Log into your web hosting account and access the auto-installer.
- Select WordPress: From the list of available applications, select WordPress.
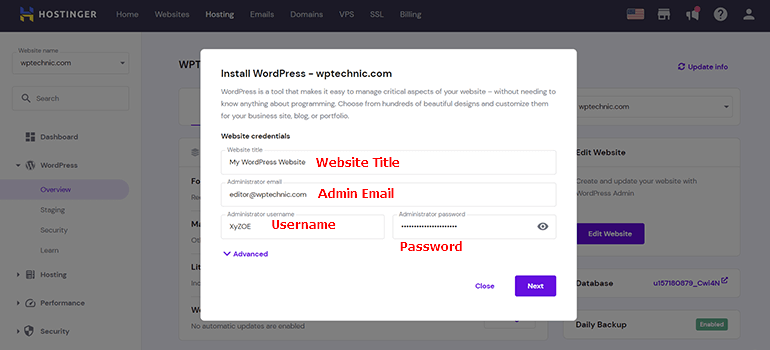
- Enter your information: Enter your website name, username, and password.
- Start the installation process: Click the “Install” button to start the installation process. The auto-installer will handle the rest, including downloading the latest version of WordPress and creating the necessary database.
We also have published a complete tutorial on how to install WordPress on any host. You may read it here.
Whether you choose to install WordPress manually or use an auto-installer, the result will be the same: a fully functional WordPress website. The choice ultimately comes down to personal preference and technical proficiency. However, the auto-installer simply makes the process quick and easy for anyone.
Step 4: Choose a WordPress Theme
A WordPress theme is a pre-designed template that determines the look and feel of your website. There are thousands of free and paid WordPress themes available, each with its own set of features and customization options.
Both free and premium themes have their pros and cons, so it’s important to consider your needs and budget before making a decision.
Free Themes
Free themes are available in the WordPress repository and are a great option for those on a tight budget. They offer a wide range of designs and functionality and are a good choice for simple or personal websites.
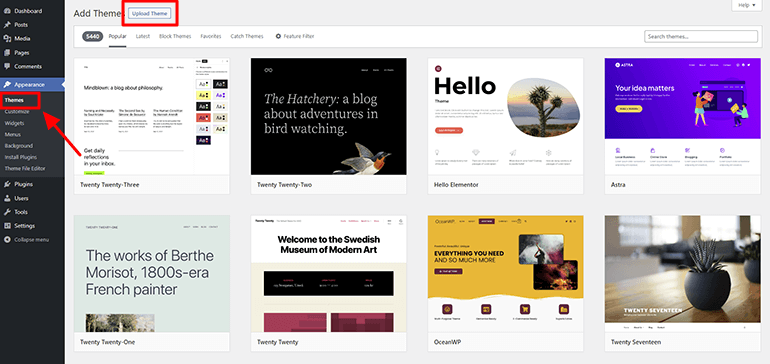
To install a theme, log in to your WordPress dashboard and go to Appearance > Themes. From there, you can browse and preview different themes, and when you find one you like, simply click on the “Activate” button.
However, free themes may have limited support options and may not receive regular updates, which can make them less secure and less compatible with the latest version of WordPress.
Premium Themes
Premium themes, on the other hand, are available for purchase and offer more advanced features, customization options, and better support. They are a good choice for businesses or complex websites that require more functionality.
Premium themes also receive regular updates and security fixes, making them a safer option for sensitive or business-critical websites.
Ultimately, the choice between a free or premium theme will depend on your individual needs and budget. If you’re just starting out, a free theme can be a great way to get your feet wet and learn the basics of WordPress. If you’re building a complex or business-critical website, a premium theme may be a better option for its advanced features, security, and support.
Step 5: Create Pages and Posts
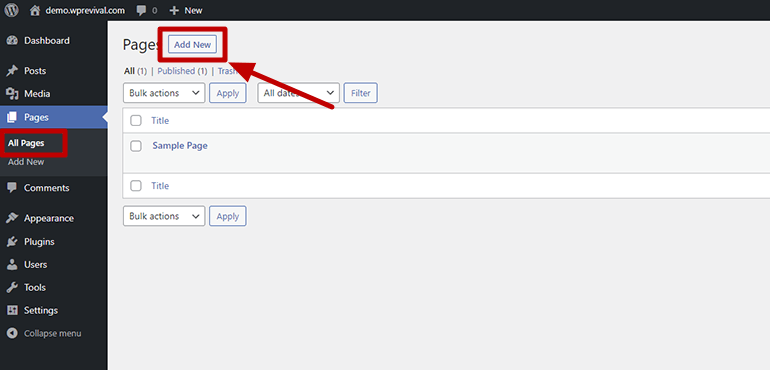
Your website is now live, but it’s empty. To add content, you need to create pages and posts. Pages are the static sections of your website (e.g. About, Contact), while posts are the blog entries that are displayed in reverse chronological order.
To create a page or post, go to the WordPress dashboard and click on Pages or Posts, respectively. From there, you can add a new page or post, and add your own text, images, and other media.
Step 6: Install Plugins
Plugins are small software programs that add extra features to your WordPress website. There are thousands of plugins available, including ones for contact forms, social media integration, and SEO optimization.
Installing WordPress plugins is a quick and easy way to add functionality and improve the performance of your WordPress website. There are thousands of plugins available in the WordPress repository, and they can be used to do things like add contact forms, improve security, optimize SEO, and more.
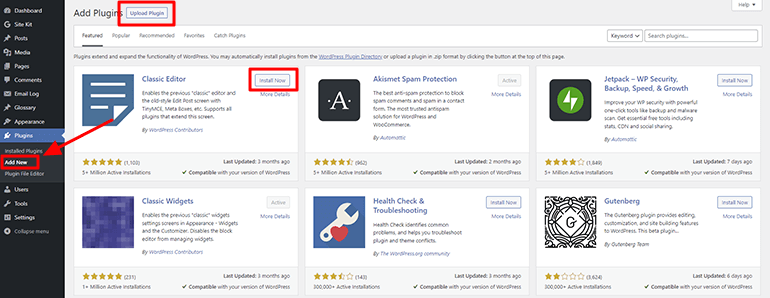
To install a free plugin, go to the WordPress dashboard and click on Plugins > Add New. From there, you can search for and install any plugins you need.
To install a paid plugin, click on Plugins > Add New. From there, click on the “upload” button at the top to upload your premium plugin.
Step 7: Customize Your Website
Once you have chosen a theme, the next step is to customize your website. This includes adding your own content, changing the colors and fonts, and adding or removing features as needed.
To make customizations, go to the WordPress dashboard and use the options and settings provided by your theme. Some themes also come with their own customizer tool, which allows you to make changes to your website in real-time.
Customizing a WordPress website is an important step in creating a unique and effective online presence. Here are some key elements to consider when customizing your WordPress website:
- Appearance: Customize the look and feel of your site by choosing a color scheme, changing font styles, and adding custom images and logos.
- Functionality: Add functionality to your site by installing plugins, creating custom post types, and setting up custom menus.
- User Experience: Improve the user experience by optimizing your site’s navigation, adding search functionality, and creating custom pages.
- Performance: Optimize your site’s performance by reducing page load times, compressing images, and using caching plugins.
- Security: Ensure the security of your site by using strong passwords, keeping your WordPress and plugin versions up-to-date, and using a security plugin.
- SEO: Improve your site’s search engine optimization by using keywords, adding meta descriptions, and using an SEO plugin.
- Analytics: Monitor your site’s traffic and performance by using analytics tools like Google Analytics.
Customizing your WordPress website requires time and effort, but the results can be well worth it. With the right customization options, you can create a website that is both functional and appealing to your target audience.
Step 8: Launch Your Website
Congratulations!
Your website is now ready to go live!
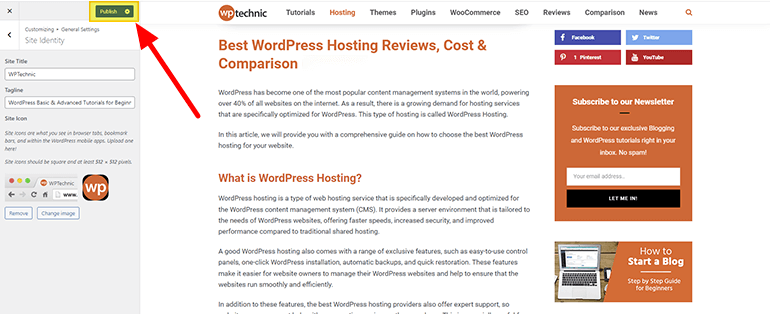
Before you do, make sure to preview your pages and check for any errors or issues. When you’re ready, simply hit the “Publish” button and your website will be accessible to the world.
And that’s it! With these eight simple steps, you now know how to build a WordPress website. Good luck, and have fun!
Some FAQs on WordPress Website
Here are some common questions and answers about a WordPress website:
