One of the reasons why WordPress is the most popular content management system is because it is so simple and easy to install. Till today, over 33.6% of websites on the internet is powered by WordPress.
In this tutorial, we will show you all the methods on how to install WordPress on any web hosting and make your website run within minutes.
For beginners, we will explain to you how to install WordPress on most popular hosting platforms by using a one-click auto installer or software like Softaculous or QuickInstall.
For intermediate users, we will show you how to install WordPress manually using FTP or FileManager in cPanel.
And for advanced users, we will explain how to install WordPress on localhost (Windows, Linux, and Mac).
Things you need before installing WordPress
Before you install WordPress, you must buy a domain name for your website and a good hosting company that offers better solutions for WordPress.
We highly recommend that you go with
Moreover, even the very basic plan on Bluehost comes with free let’s encrypt SSL Certificate for a lifetime, 1-Click WordPress install, easy backups & restore, and managed hosting solution for WordPress.
- How to Install WordPress on Any Host?
- How to Install WordPress on Bluehost
- How to Install WordPress on SiteGround
- How to Install WordPress on HostGator
- How to Install WordPress on DreamHost
- How to Install WordPress on cPanel
- How to Install WordPress using Softaculous
- How to Install WordPress using QuickInstall
- How to Install WordPress Manually using FTP or FileManager
- How to Install WordPress on Localhost (in your Computer)
- How to Install WordPress in your Language
- Things to do After Installing WordPress
- Conclusion
How to Install WordPress on Any Host?
All the best WordPress hosting companies will offer you installing WordPress with just a few clicks using the one-click installer or marketplace scripts like Softaculous.
However, each hosting platform has a different interface. Thus it is not that easy for beginners to find the easiest way to install WordPress on their chosen hosting. Let’s learn how to do that.
Since this is going to be a very long and detailed tutorial, feel free to use the navigation below to find the right tutorial as your need.
How to Install WordPress on Bluehost
Upon purchasing WordPress Hosting, Bluehost automatically installs WordPress for your domain.
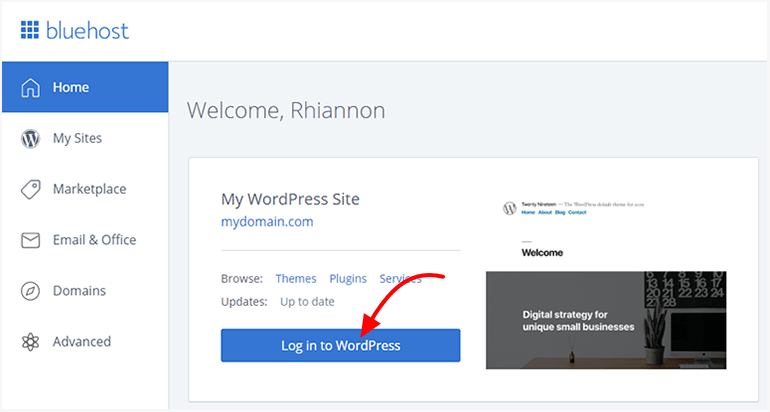
Login to your Bluehost account and you will see your newly installed WordPress site under ‘Home’ tab.
Simply click on ‘Log in to WordPress’ button and it will take you directly to your WordPress admin panel.
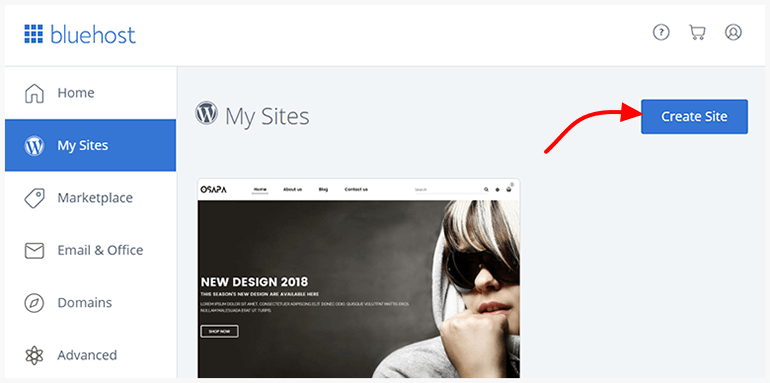
To install WordPress yourself, navigate to ‘My Sites’ tab and click on ‘Create Site’ button.
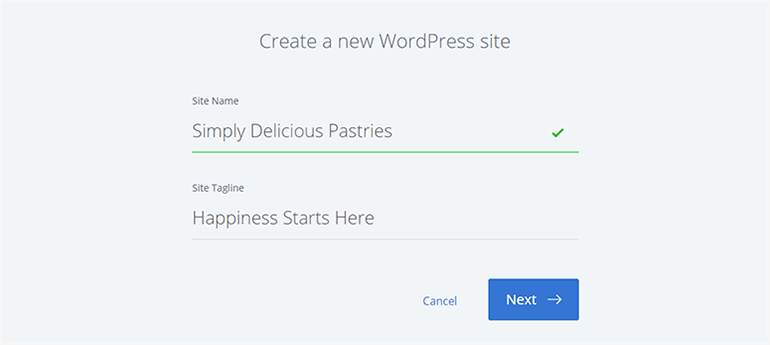
On this WordPress installation Wizard page, Enter your Site Name and Site Tagline on their respected field.
Click on the ‘Next’ button to continue.
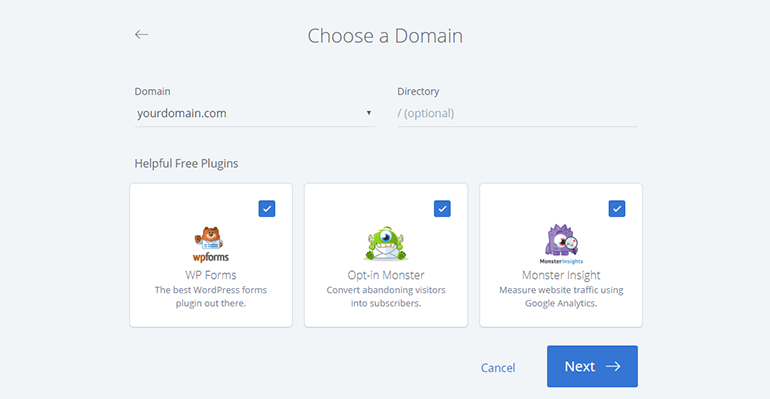
On the next page, you need to choose a domain for installing WordPress. Choose your domain on the ‘Domain’ section.
To install WordPress in your main domain, leave directory field empty (default). However, if you want to install WordPress on a sub-directory like yourdomain.com/blog then enter the directory name in the directory field.
Bluehost WordPress installer will also suggest you a few helpful plugins to install. They are automatically marked. If you don’t want to install them, unmark them.
Click on the ‘Next’ button to continue.
The installer will now set up your WordPress site and it may take a few moments.
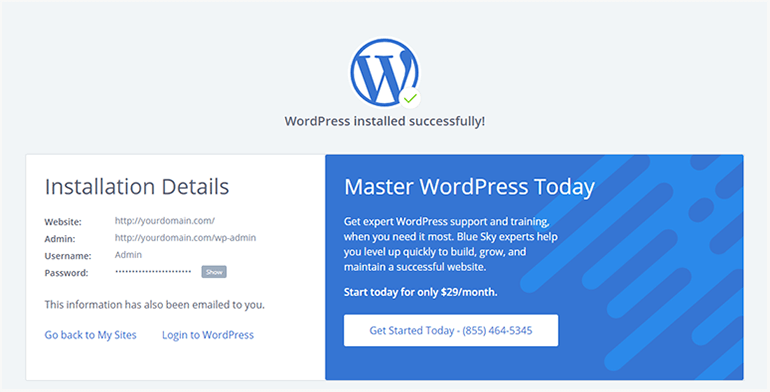
Shortly, you will see a successful message like below with installation details for your WordPress site. This information has also been sent to your email.
You can now click on ‘Login to WordPress button’ to login to your WordPress Admin area.
The default admin login URL for your website is yourdomain.com/wp-admin. You can always use that URL to login to your site using your admin username & password.
Congratulations! You have successfully installed WordPress on your Bluehost hosting account.
How to Install WordPress on SiteGround
Installing WordPress on SiteGround is much easier than any other hosting. To do that, log in to your SiteGround customer panel.
If you are login for the first time, you will see a pop-up asking if you want to install WordPress on SiteGround hosting for your domain. If for any reason, the popup doesn’t appear, you can install WordPress on SiteGround using Softaculous.
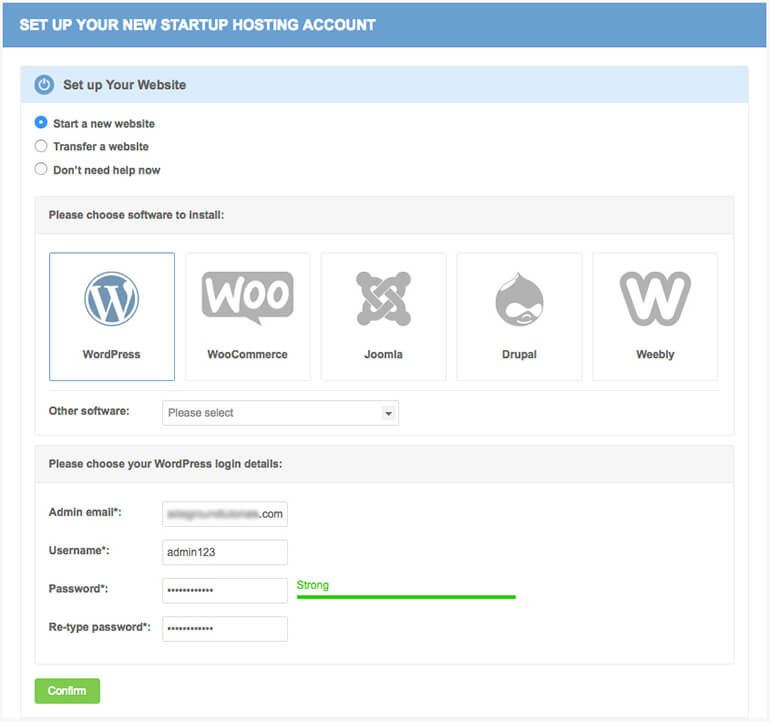
Select ‘Start a new website’ from that popup and then select WordPress as Software to install.
A new section will now appear in the installer wizard and ask you to enter login details to create an admin account for your new WordPress site. Enter your email, a username, and password to create the admin account.
Click on the ‘Confirm‘ button to continue.
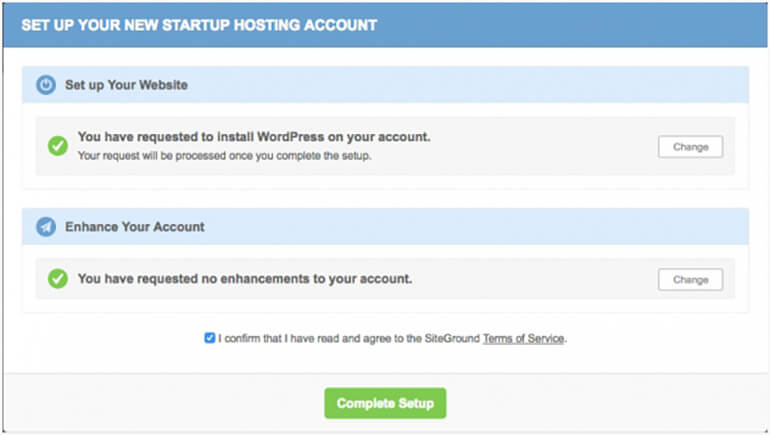
On the next page, you will see details of your selection. You can also choose additional enhancements for your website. We will skip them for now. Click on the ‘Complete Setup’ button to continue.
The setup wizard will now install WordPress for your domain. Note that, it always installs the latest version of WordPress and includes recommended themes and plugins.
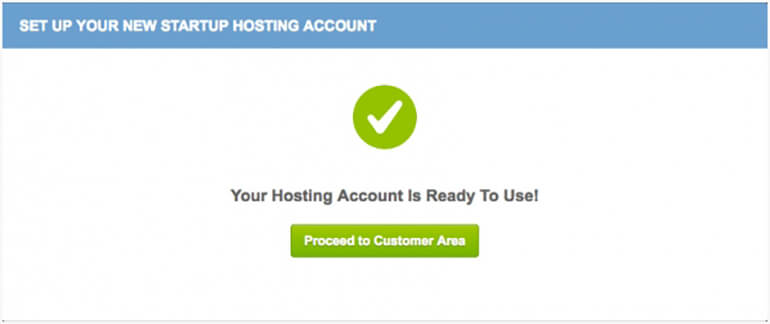
You’ll see a successful message like above when your installation is done. Click on the ‘Proceed to Customer Area’ button to return to your customer panel in SiteGround.
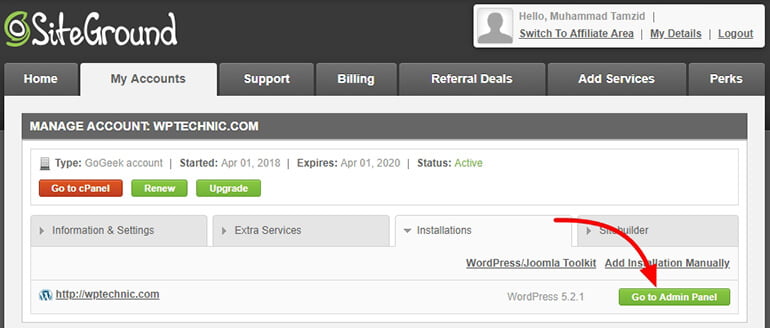
Now, click on ‘My Accounts’ tab and you’ll see your newly installed WordPress there.
From there, click on ‘Go to Admin Panel’ and it will take you to your WordPress admin area. Login using your username & password that you’ve entered on the time of installing.
That’s it! You’ve successfully learned how to install wordpress on SiteGround.
It’s a straightforward process that only takes a few minutes, thanks to SiteGround’s auto-installer. If you run into any issues, SiteGround provides excellent customer support that you can reach through phone, live chat, or email.
How to Install WordPress on HostGator
Let’s learn how to install WordPress on HostGator step by step:
To install WordPress on HostGator login to your customer portal and click on the ‘Quickinstall’ from the software section.

Now select ‘WordPress’ to launch the quickinstall wizard.
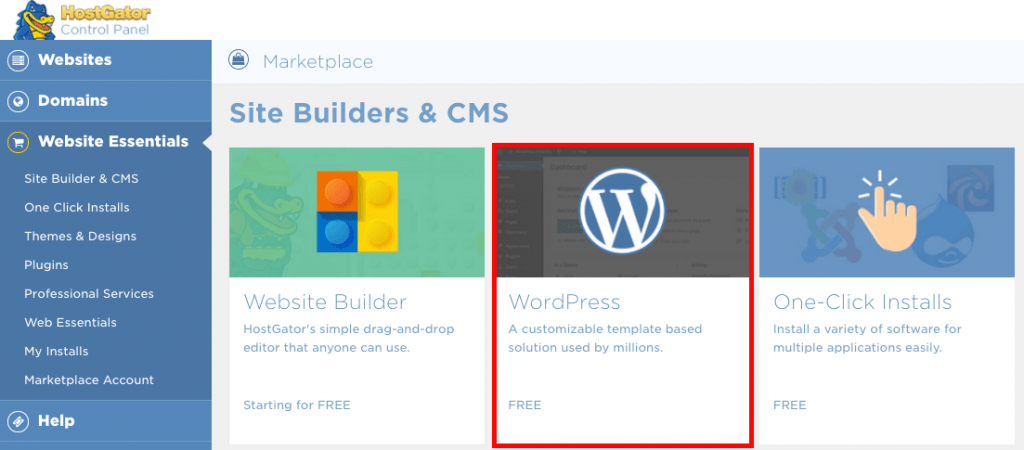
On the next screen, select your domain from the dropdown list.
If you want to install WordPress on any subdirectory, for example, domain.com/blog, then simply type ‘blog’ in the directory field.
Click on the next button to continue.
The installer will now ask you to provide details for your WordPress site. Enter your blog name in the ‘Blog Title’ field, enter a username, your name, and an email to their respected field to create an admin account for your website.
Now click on the ‘Install’ button to continue the installation process.
The installer will now check your submitted data and start the installation process. Once finished, you will see a successful message with your admin username & password.
You can now click on the ‘Login’ button and it will take you to the admin panel of your website. Log in using your username & password that you have just received.
Congratulations! You have successfully installed WordPress on your HostGator hosting.
How to Install WordPress on DreamHost
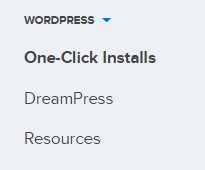
To install WordPress on DreamHost login to your control panel. Now click on ‘One-Click Installs’ under the WordPress panel menu from your left side Vertical menus.
Now from the list of One-Click-Installs, select ‘WordPress’.
Now from the WordPress installers wizard, select your domain from ‘Install to’ option. Leave the second textbox empty to install WordPress on your root domain.
From the ‘Select database’ option, select ‘Automatically Create Database’ and the installer will create and configure a new database for your website.
The ‘Deluxe Install’ feature installs free and open sources theme for Automattic, some essential plugins like Akismet, Jetpack, and WP Super Cache, and security enhancement.
If you don’t like to install those features, you may uncheck the ‘Deluxe Install’ option.
Click the ‘Install it for me now!’ button to continue.
An email with further instruction to take to complete the installation will be sent to your email within a few minutes.
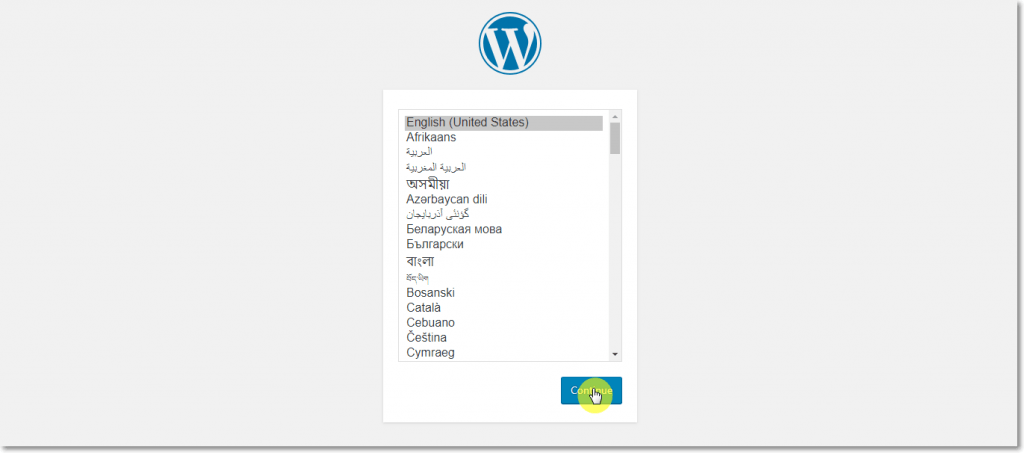
Don’t like waiting? Got you ‘yourdomain.com/wp-admin/install.php‘, choose your language preference and click Continue.
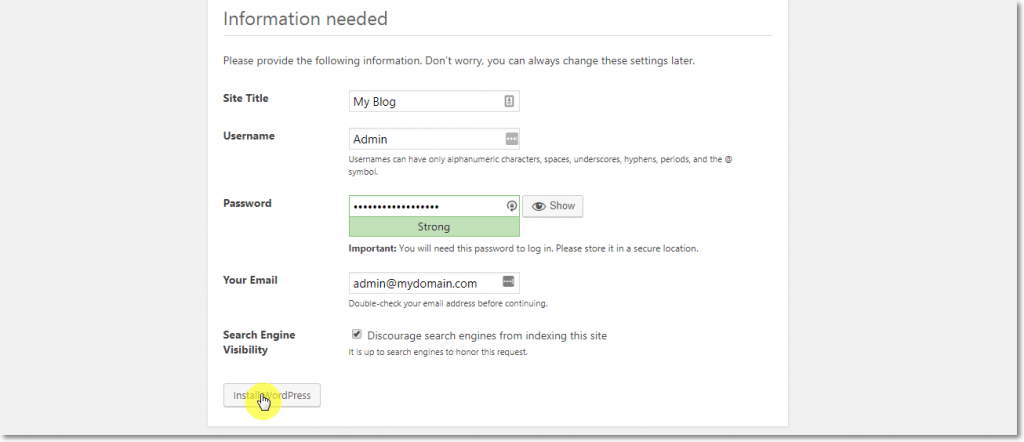
On the next screen, enter your ‘Site Title’ and create an ‘Admin account’ by entering a username, password, and your email.
If you don’t want search engines to index your website now, mark the box next to ‘Search Engine Visibility’.
Click on the ‘Install WordPress’ button to continue.
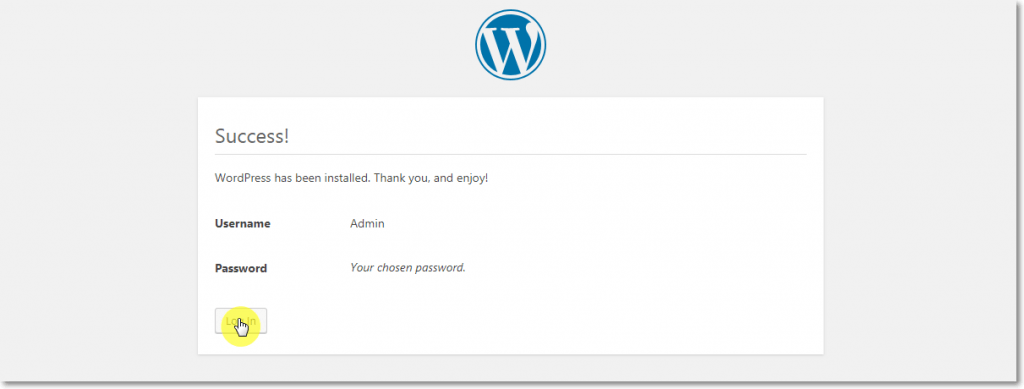
Congratulations! You have successfully installed WordPress on Dreamhost. Now click on the ‘Login’ button to log in to admin panel of your WordPress site using your username & password.
How to Install WordPress on cPanel
cPanel is a very known control panel system offered by many hosting providers. cPanel comes with many automation tools and application designed to simplify the process of hosting and developing your website.
cPanel also comes with built-in tools of installing WordPress with a single click. Hosting companies select which auto-installer tool they want to offer for their users.
The popular cPanel based aut-installer are Softaculous, QuickInstall, and Fantastico. Your hosting may offer one of them.
Let’s see how to install WordPress on cPanel using all those three aut-installer tools.
How to Install WordPress using Softaculous
Softaculous is a popular cPanel based auto-installer application that automates the process of installing web application. Many hosting companies will offer you to install WordPress in cPanel using Softaculous.
Login to your cPanel by visiting yourdomain.com/cPanel and find the Softaculous installer. Depending on your hosting, the Softaculous app may have under any section.
For example, you will find Softaculous under ‘Autoinstallers’ section in
Click on Softaculous App installer.
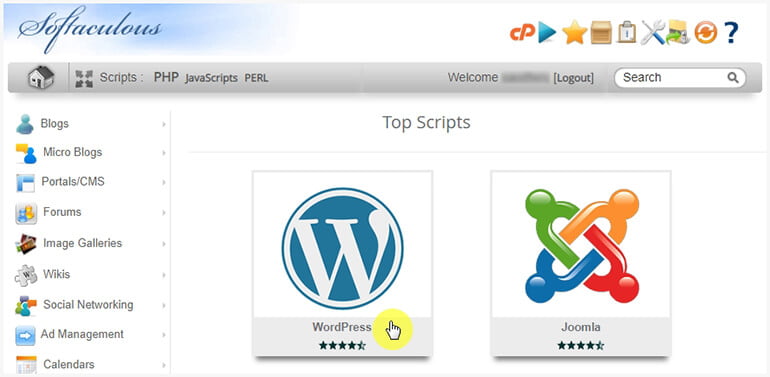
It will take you to Softaculous home page where you will see a list of a web application. Click on the WordPress icon.
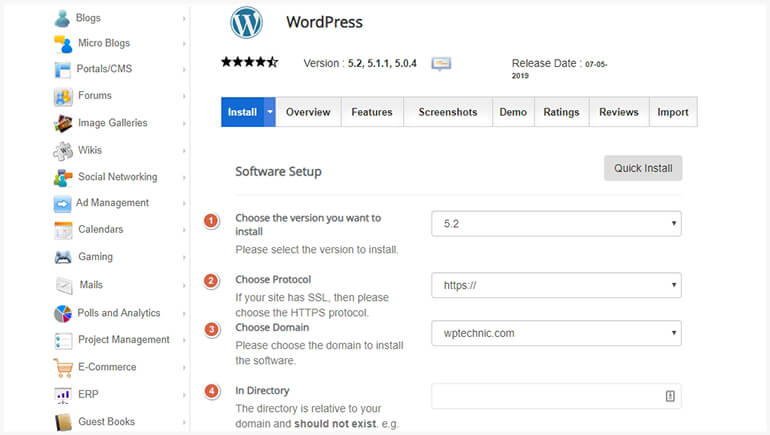
On the next page, click on Install tab from the menu bar. Now you need to provide some details for your WordPress installation.
Software Setup
The first option is the version selection. Choose which version of WordPress you want to install for your website. We recommend that you always use the updated version and not compromise with any bugs.
If your site has SSL (Secure Sockets Layer), then please choose the HTTPS protocol. Otherwise, leave it as http://.
Next, if you have multiple domain regisreted/DNS pointed to this hosting, you can choose the domain to install the WordPress.
If you are installing WordPress for your main domain, leave ‘In Directory’ field empty. If you want to install it for any subdirectory, for example, yourdomain.com/blog, then simply type “blog” in this field.
Site Settings
After that, provide your site name and description in the ‘Site Settings’ section. You can always change them from your admin panel later.
To enable the multisite feature, check the box beside ‘Enable Multisite (WPMU)’ option. Otherwise, leave it empty.
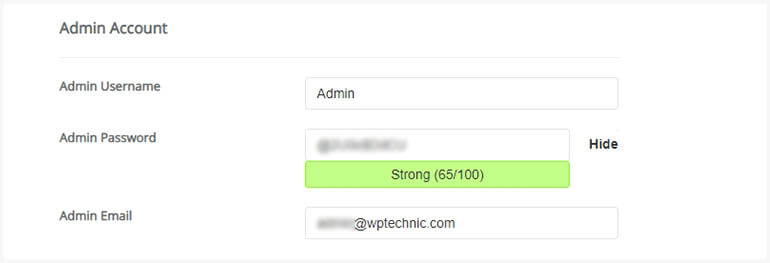
Admin Account
The next section is ‘Admin Account’. Enter admin username, password and email to create an account on your WordPress with Administrative role.
Make sure to use a correct email address, because WordPress will send you installation instruction and password reset link to that email. Also, don’t forget to use a strong password to secure your website.
Choose Language
Next, you can select the language for your WordPress site among over 35 languages supported by WordPress. You can change it later anytime you wish from your admin panel.
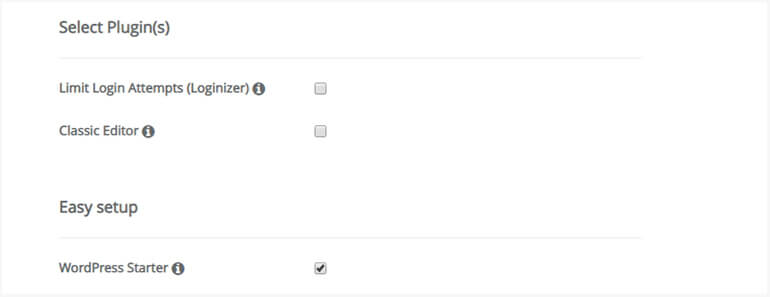
Your hosting may add some additional options like theme and plugins to install, setup plugin wizard, or even backup option. However, they are optional and you can simply skip them or mark the checkbox to install them.
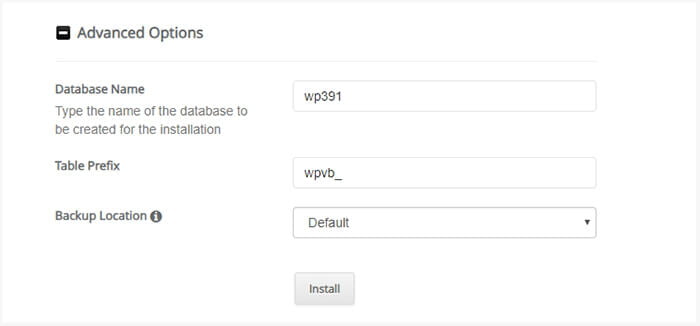
Advanced Options
In the ‘Advanced Options’, you can customize your Database name, Table prefix, and Backup Location here. You can simply skip this setting to use the default settings.
Click ‘Install’ button to continue.
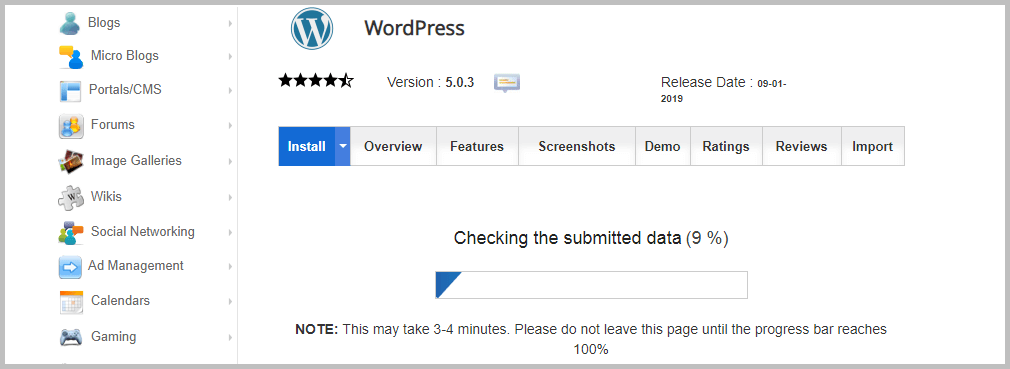
Softaculous will now check your submitted data and start the installation process. This may take 3-4 minutes only to finish the process and you shall not close or refresh the current window in the meantime.
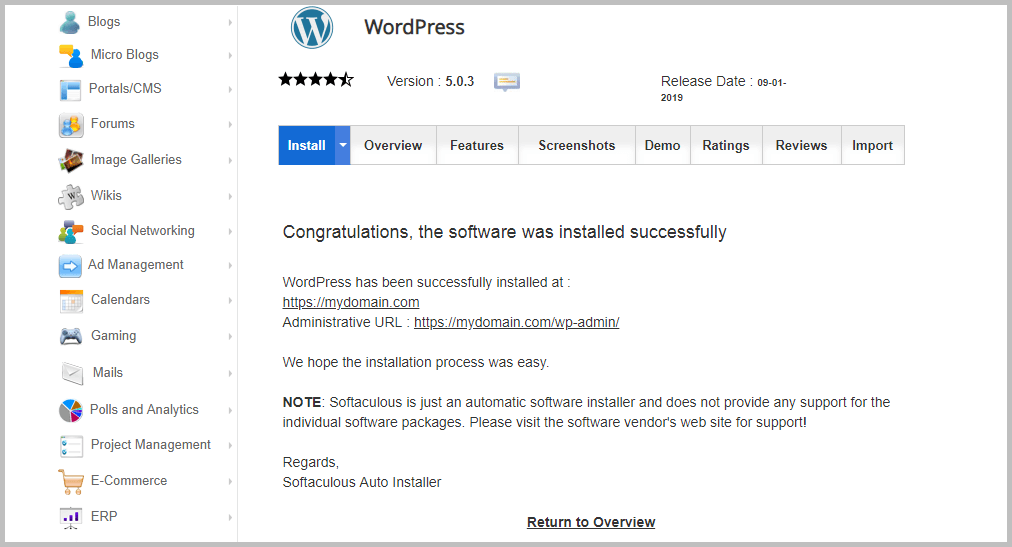
Congratulations, WordPress has been successfully installed for your website. You will get the Administrative URL for your website here which is by default yourdomain.com/wp-admin.
You can now go ahead, click on Administrative URL and log into your WordPress admin area and start creating your first post. You can also click on ‘Return to Overview’ to see the overview of your Installation.
That’s all. You’re done with installing WordPress in cPanel using Softacolous.
How to Install WordPress using QuickInstall
Like Softaculous, QuickInstall is another auto-installer application that automates the process of installing web application.
Many hosting companies like HostGator and others will offer you to install WordPress from your hosting control panel using QuickInstall.
Login to your control panel by and find the QuickInstall application. Depending on your hosting, the QuickInstall app may have under any section. We are using
Click on the QuickInstall icon in the software section.
This will take you to the QuickInstall application page where you will see a list of a web application available for install. Click on the WordPress icon.

Now from the installer (setup wizard), select your domain from the dropdown list. Leave the directory field empty to install WordPress on your main domain like wptechnic.com
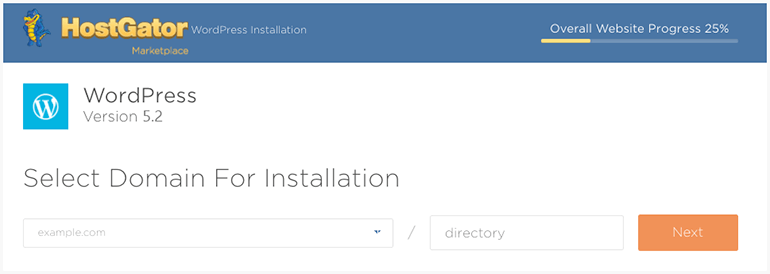
Click on the next button to continue.
Now the installer will ask you to enter some details for your new WordPress site. Enter your blog name, username, your name and your email in their respected field.
Click on the ‘Install’ button to continue.
QuickInstall will now check your submitted data and install WordPress for your domain. After that, you will see a successful message with our admin username & password.
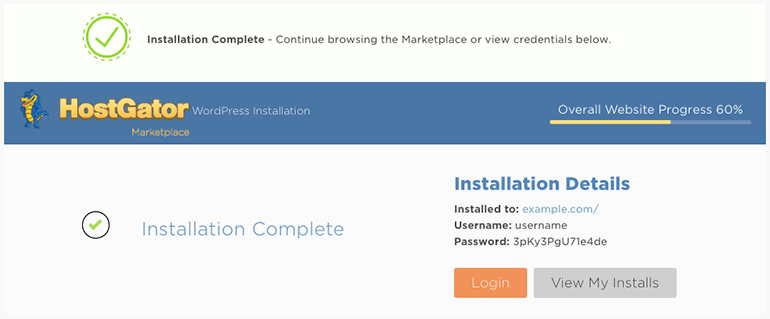
Now you can click on the ‘login’ button to access your website’s admin dashboard using that username & password.
That’s all. You have successfully installed WordPress using QuickInstall feature on your favorite hosting.
How to Install WordPress Manually using FTP or FileManager
Most WordPress hosting companies offer auto-installer or scripts like Softaculous to automate the installation process that you don’t even need to install WordPress manually.
However, if you need to Install WordPress manually for any reason, it takes less than TEN minutes to make your website ‘Live’.
To install WordPress manually, we will perform following five actions:
- Downloading the WordPress files
- Uploading WordPress Files using FTP or
- Uploading WordPress Files using FileManager
- Creating a MySQL database & a User
- Begin the installation process
Downloading the WordPress files
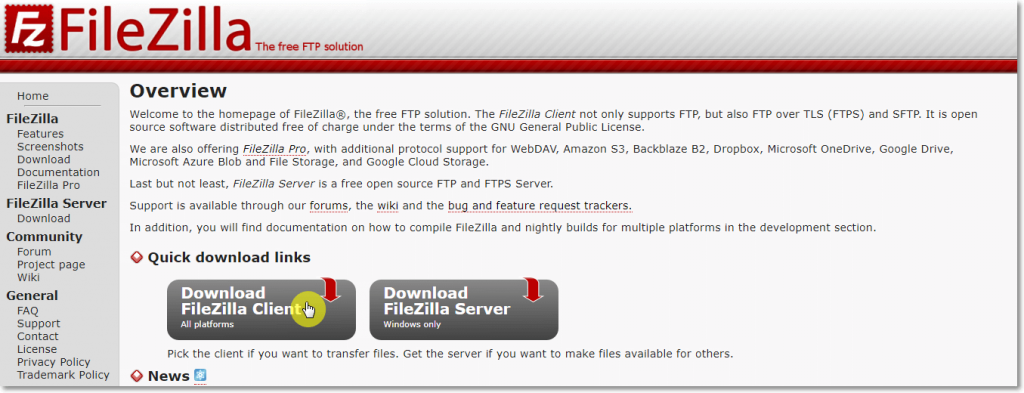
To start the installation process, you need to download WordPress from its official download page.
We recommend that you always download the latest released version of WordPress from their official source only.
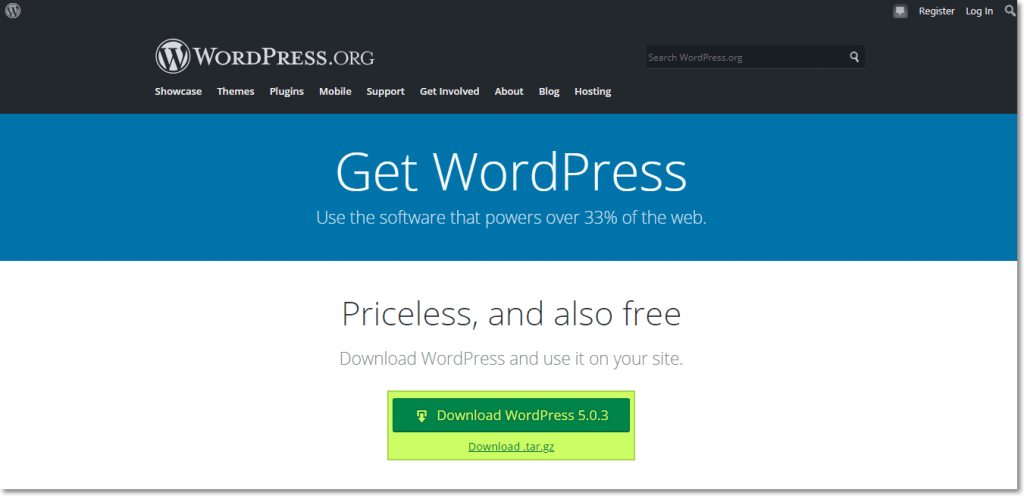
Click on the download button, marked as in the above screenshot, the installation package will be downloaded and saved to your computer.
Uploading WordPress Files using FTP
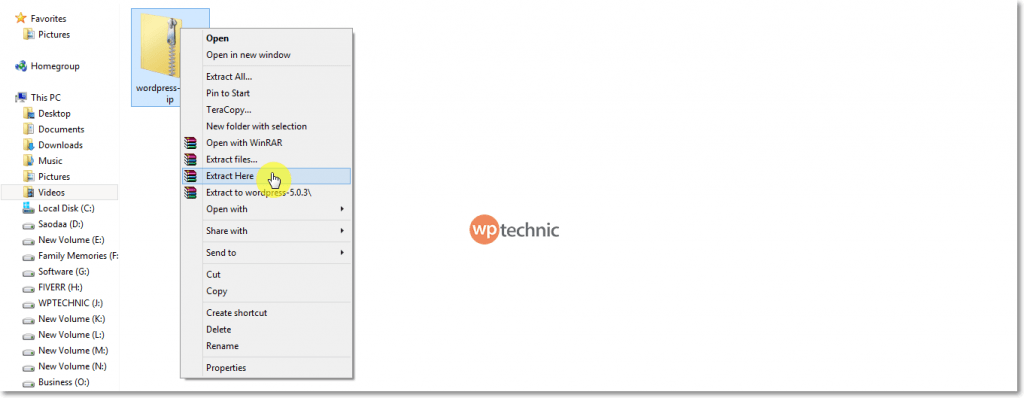
Now go to your download folder, click on the zip file that you’ve just downloaded and unzip (or extract) it to a new folder.
Now, you need to upload all the files of that WordPress folder to your web hosting using an FTP Client or directly in cPanel using File-manager.
To upload WordPress files to your web server you can download and install any FTP client like FileZilla, or Cyberduck for your computer. We are using FileZilla in our case.
To use an FTP client and connect it with your web server, you need login credentials with proper access.
To learn how to get FTP credentials from your hosting and how to connect FTP client to your hosting server, read this tutorial.
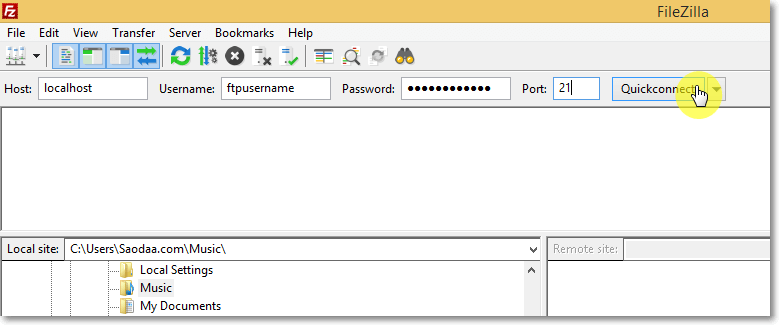
Now, open the FTP client and enter your Host name, FTP username, FTP password, and Port to connect with your website.
You can enter your domain name or its IP address in Host name field, and Port is 21.
However, this information may vary and you can get all the right information from your hosting provider.
If everything is good, click on ‘Quickconnect‘ button and you will be connected to your hosting.
You will see a list of files and folders on the right side of the FTP client window. Those are your hosting/server/web files.
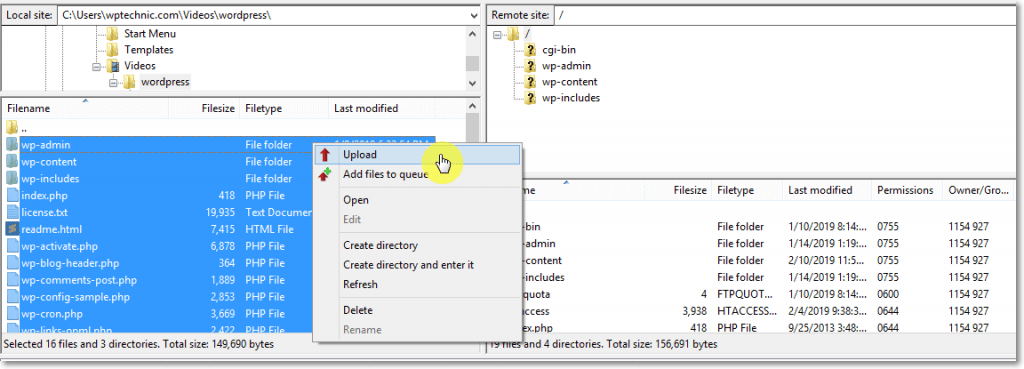
Now on the ‘Remote site’ column, navigate to the path public_html folder to install WordPress on your root domain like yourdomain.com. If you want to install WordPress on another directory then upload the files there.
Now, from your left-hand side, navigate to your download folder, click on the WordPress folder. Select all the files from the folder that you extracted before. Right click on them and select Upload.
That’s it, you are done with the FTP part.
Uploading WordPress Files using FileManager
Other than using FTP to upload WordPress files, you can also upload them using FileManager option in cPanel.
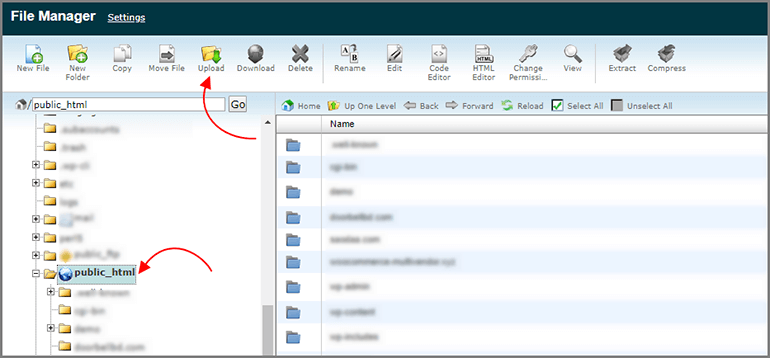
Login to your cPanel and click on ‘File Manager’ option.
On the next page, navigate to the path public_html folder to install WordPress on your root domain like yourdomain.com.
If you want to install WordPress on any subdomain or another directory, select that folder. Click on ‘Upload’ button to upload your files on the selected folder.
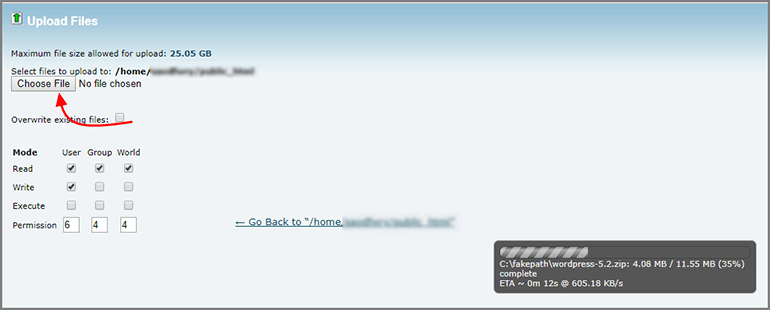
Now on the next screen, simply click on the ‘choose file’ button and select the “WordPress ZIP file” (not extracted one) from your computer hard drive. Uploading will be started immediately.
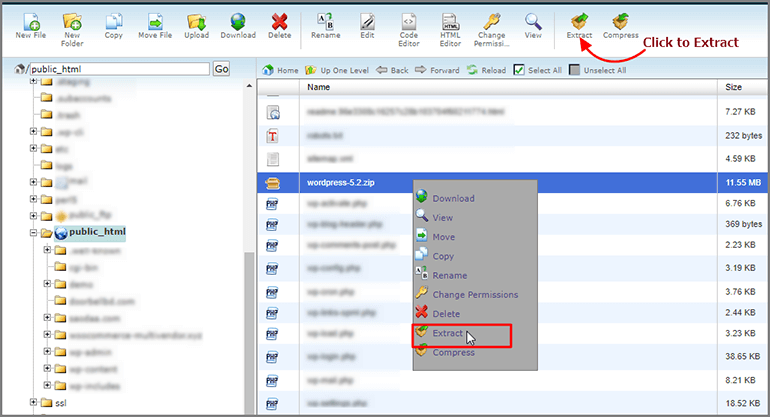
Once completed, go back to your file manager and refresh the page. You’ll see that the WordPress zip file has been uploaded there.
Now select that Zip file, right click on it and select ‘Extract’. You can also click on the extract button from top menu option.
That’s all. You’re done with uploading the files using FileManager option from cpanel.
Creating a MySQL database & a user
Now you need to create a MySQL database and a MySQL user and then assign the user to the database with full access.
Note: you can also install WordPress on MariaDB database management system instead of Softaculous. We’re using MySQL to prepare this tutorial.
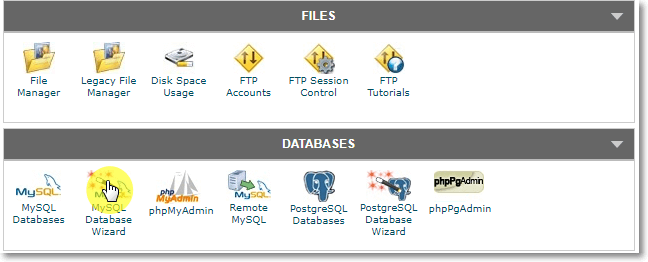
Go to your hosting control panel or login to cPanel and search for the option/button to create a database. We are using SiteGround cPanel hosting, thus our screenshots will be of cPanel.
Click on ‘MySQL Database Wizard‘ from your cPanel.
On the next page, enter your database name to create the new one. By default, the database will always include your ‘cPanel username‘ as a prefix.
Once ready, click the Next Step button.
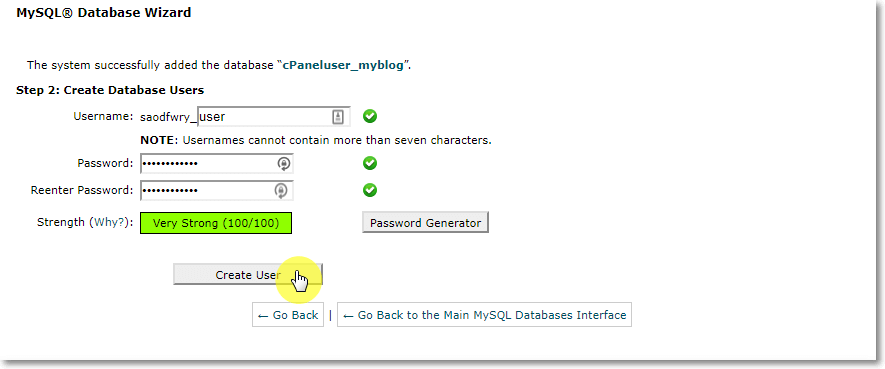
Now that you have created a database, you can create and assign a user to that database on this page.
Here, username also includes your cPanel username as prefix and you shall provide a unique name to it. Then you can provide a strong password or user the ‘Password Generator‘ button to generate a unique password for your database user.
Click on “Create User” button. The user will be created and assigned to that database. On the next page, you can set access permission for your database user. Click next to finish your steps.
Make sure you note down the database name, username, and password that you’ve just created. You will need those for the installation process later.
That’s it! On the next page, you will see a confirmation message telling you of the successful completion of the operations.
Begin the installation process
Now it’s time to run the installation process. If you have uploaded WordPress files in your public_html directory then enter your domain name in the web browser like example.com or www.example.com.
Please note: If your main domain doesn’t redirect you to the installation page, you may trying typing yourdomain.com/wp-admin/install.php
In this window, select the language for your website and click Continue.
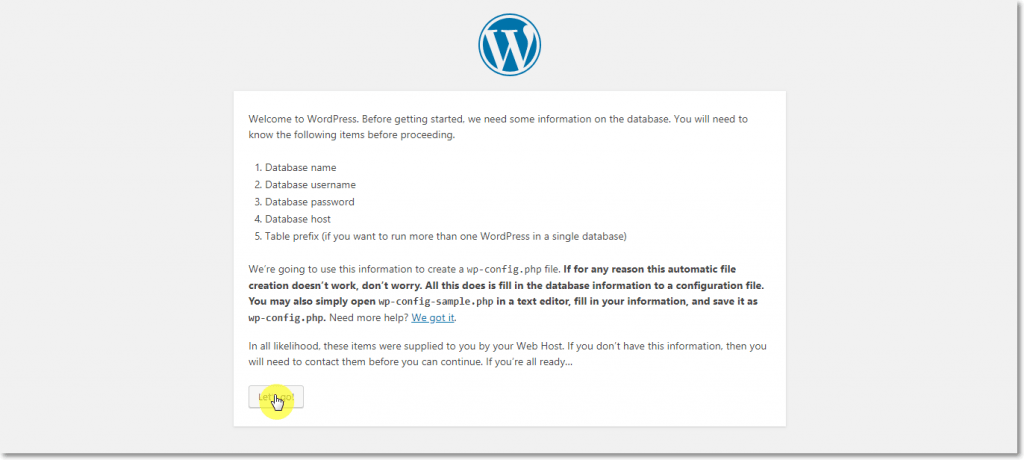
On the next page, WordPress will tell you to prepare the necessary info to connect the WordPress with your database. You have saved them from the previous step.
So click on ‘Let’s Go’ button.
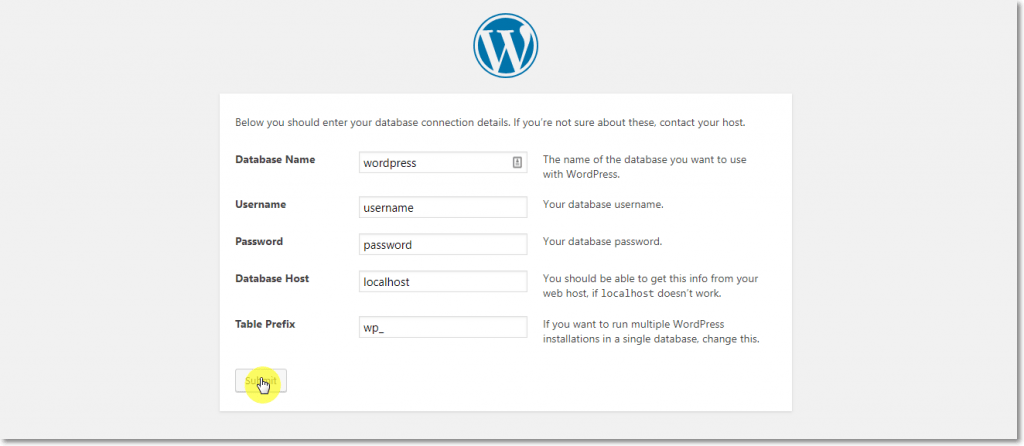
On this page, provide your database information in their following tables. Database Host is by default ‘localhost‘. If that doesn’t work, you can contact your hosting provider to get the right info.
Table Prefix is by default “wp_” you can change it to anything you want. Press the Submit button.
WordPress will now run your information and try to connect to your database. If your information is correct, you will see a confirmation screen.
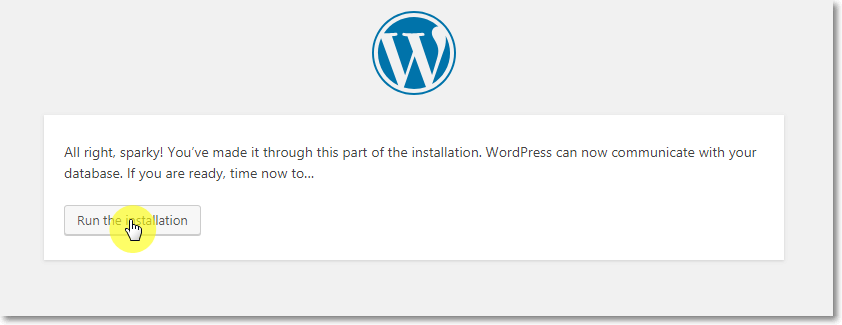
Now click on “Run the Install” button to continue.
On the next page, you need to provide your website/blog Title and Admin username, password, and your email to create a user with Administrative role.
If you want your site not to be indexed by search engines like Google, for now, you can mark the checkbox for the ‘Search Engine Visibility‘ option. You can change it later from settings when you are ready to go for the public.
Click on “Install WordPress” button to finish the installation process.
WordPress is now successfully installed for your website.
And that’s it!
You just learned how to install WordPress manually using FTP or in cPanel. Now it’s time to login to your admin area and create your first WordPress post.
How to Install WordPress on Localhost (in your Computer)
Installing WordPress in your personal computer is actually for advanced level users. They install WordPress in their localhost to develop themes or plugins or checking out the WordPress features.
If you are planning to develop or create a WordPress website for people to visit your website, then this method is not for you. Because only you can see and access your locally installed WordPress site.
To make your website live and availeable for everyone on the internet, then get a WordPress hosting and install your website there using any of the above methods.
If you understand what you are doing and need to learn how to install WordPress on localhost in your personal computer, then we highly encourage you to do so.
Based on your computer type, feel free to download and setup any open-source cross-platform web server solution like XAMPP, WAMP, or MAMP.
How to Install WordPress in your Language
WordPress is the number one content management system for so many reasons. A great feature of WordPress is that you can install WordPress in your native language.
WordPress supports more than 115 languages and you can install WordPress in your preferred language during the time of installation.
However, after installation if you want to change your WordPress language you can do that by going Settings > General from your WordPress admin panel.
Things to do After Installing WordPress
Now that you have successfully installed WordPress, here are a few things to help you with getting started your new WordPress site.
Installing a theme
After installing WordPress for your website, the first thing you should learn is about installing a new theme. Your website’s appearance and back-end features are mostly controlled by the active theme.
You can directly search and install a theme among over six thousand themes from the WordPress theme directory for free using theme search functionality from your admin panel.
Learn more: How to Install WordPress Themes
Installing Plugins
Plugins in WordPress can help you to extend the functionality of your website. Plugins are widely used in WordPress that there is a saying that “there’s a plugin for that”. No matter what feature you want to add on your site, you will surely find a suitable plugin for that.
Learn more: How to Install WordPress Plugins
Creating your First Post
Now that you have learned how to install a theme and plugins, I believe you are ready to start creating your first post in your new WordPress website.
WordPress’ new “Block-Editor” feature makes it super easy for anyone to create and customize a blog post.
Learn more: How to Add a New Post in WordPress
Conclusion
That’s all. We are done with learning how to install WordPress on any hosting. Now you can install WordPress very easily for your website following any of the above methods.
Did I cover all the steps properly? Or I missed anything?
How you are going to install WordPress for your site, One-click installer, Manually or using apps like Softacolous?
Let me know by leaving a comment below right now.

